01 Aug Sat 2009
the smashing story -lacto-fermented sauerkraut- part two
 three short days later and the sauerkraut is ready! i guess in this heat, the process speeds up considerably. i was expecting a few more days needed for fermentation but not so. hey whatever works - it will keep curing and flavoring up in the fridge. this is a food stuff that only get's better with time.
 beautiful golden color - a few fennel seeds scattered about - personal flavor preference
pack the kraut in the jars and mash it down just as you did in the fermentation container
pour off equal amounts of the juicy juice into each jar and cover
you are done!
 2 medium sized cabbages put up a good 3 well packed quarts and a snack size 1/2 pint bit for later. off to the fridge they go
yummy yummy
you can do this - anyone can do this -
it is cheap - it is easy - it is really really really good for you
if you missed part one - never fear, just click 'here'
hippychick
03:54 PM CDT
lacto-fermented sauerkraut- the smashing story!
 and now to bring you the smashing story of lacto fermented sauerkraut
you will need
cabbages - i used two medium sized
whey - from organic whole milk is best
salt - i use kosher flaked salt
a smasher - i use my potato masher
a large food grade bin with an airtight cover
a large plastic bag
water
 you will be slicing your cabbages into thin shreds. you can do this by hand or with the help of a processor. today, i'm using a processor fitted with a slicing blade.
 remove the top four or five outside cabbage leaves and place to the side - you will be using several of these down the line. remove the cores from each cabbage and discard for compost. (worm food!) chop your cabbage into slivers or into sizes large enough to fit into your processor's shoot.
 feed the cabbages through the shoot. it took me four rounds to get through the two cabbages. i placed the finished cabbage in a large bowl to the side as each bit was processed.
 then you begin the smashing and mashing. place about 2" of cabbage into your bin, sprinkle just a bit of flaked salt over the top, pour in two tablespoons of whey on top (i eye all this) then start mashing and smashing with your potato masher until juice emerges from the cabbage. this is a workout folks!
repeat this layering process until you have smashed all cabbage into your food grade bin. the above is what it looks like once smashed. yup it's true all that cabbage smashed down to half the volume of this container.
once smashed, layer two or four clean cabbage leaves on top of your future sauerkraut. then place a large plastic bag on top of the leaves, wrapping the edges of the bag over the edge. make sure your bag does not have any leaks. fill the bag with water. this weights down the cabbage keeping the cabbage submerged in the juice created through the mashing.
 once the bag is filled, fit the cover onto your container. you need an airtight seal. the water fills all the interior space and the cover ensures a good seal. leave your cabbage in this container in a dark location (away from direct sunlight) for 3-5 days, it may take longer if you live in a cooler climate. remove any scum that forms on the top daily by removing the cover, the water bag, skimming off and then replacing the water bag and cover.
you will see bubbles once the fermentation process begins - this is good! i will be back in a few days to show you the progress of this batch. and then again when i jar it up.
super easy easy easy
there you have it - a smashing story!
cheers
more to come...
hippychick
03:53 PM CDT
the slow drip continues - farmhouse chedda' -n- whey ricotta
 More cheese gromit!
Hippychick is making cheese!
Real cheese with real straight from the cow raw milk.
 Here we have a gallon and a half of whole raw milk.
yes indeed the golden hue is real - sure makes me smile.
golden milk on the golden farmhouse cheddar trail.
Farmhouse Chedda
*it is important to use stainless steel or enamel pots and utensils to avoid off tasting cheese
- heat the milk to 90 degrees F - i am using a double boiler set up - a smaller stock pot inside a larger stock pot. the larger stock pot filled with water so as to keep the milk off direct heat and to better distribute the heat to the milk evenly
- once the milk has reached the 90 degrees F turn off the heat - it should hold it's temperature aided by the hot water bath it is sitting in
- add a packet of mesophillic direct set starter culture and stir into milk evenly - you may wish to stir slowly for a good 3 to 4 minutes {note - i get my starter from new england cheesemaking supply company }
- cover and allow your milk to sit for 45 minutes to culture
- in a separate container, add 1/2 rennet tablet or 1/2 teaspoon liquid rennet to 3 tablespoons cold water - if using the tablet rennet, crush and stir until the tablet is dissolved. *do not use hot water, you will kill the effectiveness of the rennet
- after the 45 minutes of culture, add your rennet pouring it in slowly in circles, then slowly stir for even distribution
- cover and allow your milk to sit for another 45 minutes - this is the curding process - if you find that your milk does not curd well in the first 45 you may allow it to sit up to 2 hours
- cut the curd into 1/2" blocks with a curd cutter or sharp stainless steel knife - slicing all the way down into the pot - slow and steady folks - do not rush
- place the pots back onto heat and bring the temperature slowly (very slowly 2 or 3 degrees every 5 minutes) up to 100 degrees. you will notice the curds shrink - you can have some fun here and sing 'i'm shrinking, i'm shrinking...' much as the wicked witch of the west sang i'm melting... this is about a 25-30 minute process. plenty of time to work on your wicked witch of the west impersonation.
- once you reach temperature (100 degrees), remove from heat, cover and let set for 5 minutes

- set up your drain system - place a cheese cloth lined colander in a larger pan and/or very clean dish pail - there will be near to 2 gallons of whey to drain so use a large size lower pan
- uncover your pot and remove the smaller pot from the larger - clean your larger pot and set aside.
- slowly pour the curds and whey over the colander. i pour out half of the pot just before the curds begin to trail out, transfer the poured whey to the larger (former water bath) pot then continue to pour the remainder of the curds and whey into the drain system. why do i do it that way - i find it easier to handle the pouring of the whey back into the pot - less weight to balance - less mess to be made
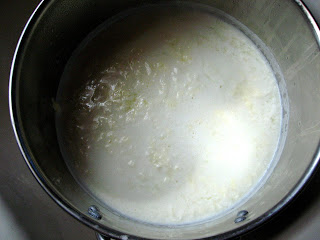
 this is what it will look like - curds above - whey below
check out these booty kickin' curds hippie folk
golden bits of goodness
- wrap the cheese cloth up and gather at the top then hang over a pot or bowl for an hour to allow any additional whey to drain from the curds
 after the 60 minute drip, remove the curds from the cloth and slowly work in 3/4 to 1 tablespoon of salt. i use my hands for the mixing. *do not use salt that has been treated with iodine - again you will experience and off flavor.

 while mixing in the salt, slowly break the curds into small acorn sized pieces

you could make your own home made cheese press as seen at david b. frankhauser's great cheese site - i got my cheesypress from jack schmidling productions inc - there are options - it is up to you - move forward as you wish

- pack the curds into a cheese cloth lined mold folding the cheese over the top


 apply 10 pounds of pressure for 15 minutes
- turn the cheese over apply 20 pounds of pressure for 12 hours
- turn the cheese over apply a second round of 20 pounds of pressure for 12 hours
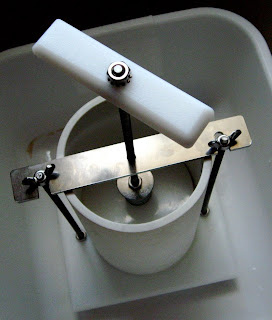
- remove the cheese from the mold and carefully peel away the cheesecloth, taking care not to rip the surface of the cheese
- air dry at room temperature on a wooden board {turning the cheese several times a day to prevent moisture from collecting on the bottom} until a nice rind had developed and the surface is quite dry - this is a 3 to 5 day process - *note - a cutting board will work just fine as your drying board, just make sure the board is clean clean clean before setting your cheese out
*photos to come*
not at this stage yet
- after your drying process, wax the cheese and age for a minimum of 60 days *the longer you age your cheese - the spikier it will get
- tic toc tic toc - enjoy!
 next up - what to do with all that whey!
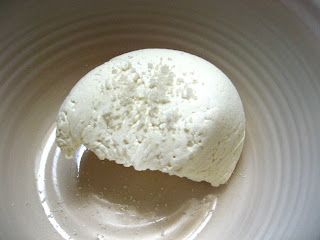
whey ricotta cheese
* note your whey should be no more than 2 hours old *
 pour your whey inoto a pot and heat to 195-200? - do not boil the whey - a slow and steady heating process is best allowing you to better control the temperature gain
- as soon as your curds separate - remove your pot from the heat and set aside for 10 minutes


- slowly slowly pour off your curds and whey into a cheese cloth lined colander

- tie up your curds, hang and allow to drain for 20 minutes
- season curds as your wish and refridgerate
- use your cheese within a week -
here is another great site with step by step ricotta making cheesey steps
ricotta making illustrated
some ideas for eating your own homemade yummy ricottta cheese:
- seasonal veggie lasagna
- stuffed squash flowers
- add it to a yummy breakfast coffee cake
- serve it over fresh fruit for a cool summer desert
- eat it just as it is
...and about that whey?
- bake with it
- lacto-ferment veggies with it
- drink it
- feed it to your creatures
- water your plants with it
It's good stuff - down the drain would be a shame
Do check out new england cheesemaking supply company
it's a hippychick favorite - i bet wallace and gromit appreciate their good work too!
hippychick
03:51 PM CDT